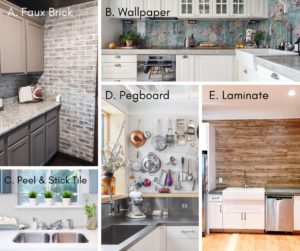
 We are onto the next project for our DIY Month series! We started in the kitchen and we are staying there this week, focusing on installing a new backsplash. Backsplashes are typically installed to prevent oils, grease, and other ingredients from ruining the walls in your kitchen. While this is their primary purpose, many now use backsplashes to make an aesthetic statement in their home as well.
A quick internet search will yield a number of backsplash DIY options. Anything from old maps to wallpaper to roof tiles to salvaged wood to beadboard have been used to create interest (and protect the walls) in one’s kitchen. However, whatever material you choose, here are some steps to ensure your project is a success.
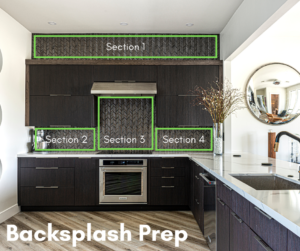
MEASURE. Measuring, of course, seems like a no-brainer, but a helpful way to ensure you purchase enough material is to break your area into sections. The photo below depicts how to do this in your own kitchen.
- Break your surface area into sections.
- Measure the width and height of each section.
- Calculate the area of each section by multiplying the width times the height (w x h).
- Add the total area of each section together for the total square footage.
- Add an additional 10% to the project for contingency.

PREPARE. Whatever material you are using, make sure that you clear your countertops. Disconnect and move all appliances; turn off the electricity to the area; and remove outlet faceplates. Also, depending on what kind of material you are using, it is helpful to place cardboard over the countertops and tape the countertops as well.
Even if you are using peel-n-stick tiles or wallpaper, it is crucial that your walls are clean to ensure that they properly adhere to the surface. Go the old fashioned route and use warm, soapy water or you could use a higher concentrated cleaner (e.g. Lestoil) to make sure that your walls are free from grease.
In addition to cleaning your walls, it is also important to fix any holes to allow for proper adhesion. Similar to painting, you will want to fill in holes with spackle and then lightly sand the surface so that it is smooth. Then wipe down the area with tack cloth so there is no lingering dust.
PRACTICE. Yes, it seems odd, but practice. Complete a trial run of covering your wall with your materials. Mark where sections end with pencil, trim materials as needed, and label where they will be placed. By doing a run through of your project, it will ensure you have everything you need prior to starting the job. This also prevents any surprises from occurring once you begin.
Once you have gone through your trial run, the real fun begins. Here is where you take your materials and begin the application process. Whatever type of backsplash you are choosing, whether it laminate, artificial stone, peel-n-stick, or whatever, be sure to consult the proper sources to understand the adhesion process and how guarantee your work will turn out successfully. Then work efficiently as you move through your project, and then enjoy both the aesthetics and functionality of the end result.
